Sony recently added support for external storage on the PlayStation 4 and PlayStation 4 Pro. As a result, gamers can now be able to add more free space to the system via an USB storage device between 250 GB to 8 TB. One of the more popular choices currently on the market is the Western Digital USB 3.0 My Passport Portable External Hard Drive. Below, you can find our guide to installing this particular hard drive product on Sony’s gaming console.
Why buy Western Digital USB 3.0 My Passport Portable External Hard Drive
So why should you buy the WD USB 3.0 My Passport Portable External Hard Drive if you are looking to add more free space for your PlayStation 4? For one, the Western Digital brand is known for having some of the most reliable external HDDs on the market in terms of having a low failure rate.
Furthermore, the My Passport products use an USB 3.0 connection, which takes full advantage of the fast transfer speeds of the PS4’s USB 3.0 ports. There is also no need to use a power outlet (like you would have to with an external desktop hard disk drive) as the WD portable drives are powered through the same USB connection.
Not to mention that the prices are also very competitive when compared to other brands. You can check out the price tags of the different size options with the following links:
There are also multiple color options: Black, Blue, Red, Orange, White and Yellow.

So, if you are looking for an external drive for your PS4 or PS4 Pro, then we highly recommend checking out WD USB 3.0 My Passport Portable External Hard Drive.
Connecting the External HDD to the PS4/PS4 Pro
The first thing you want to do when it comes to setting up the WD My Passport Portable External HDD for use with the PlayStation 4 is to connect it to the system. Use the USB cable to connect the hard drive to the console. The standard PS4 has two USB ports on the front-facing side while the PS4 Pro has two USB ports in the front in addition to an extra port located in the back.
Formatting the WD My Passport Portable
If the connection is successful, you should get a notification stating that you can use the USB storage device as external storage after formatting it. From the notification, you can go directly to the “USB Storage Devices” menu.
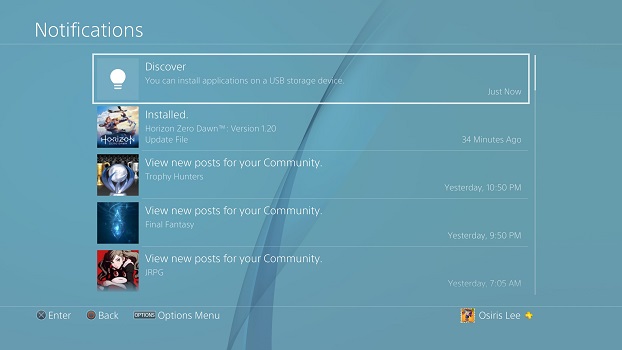
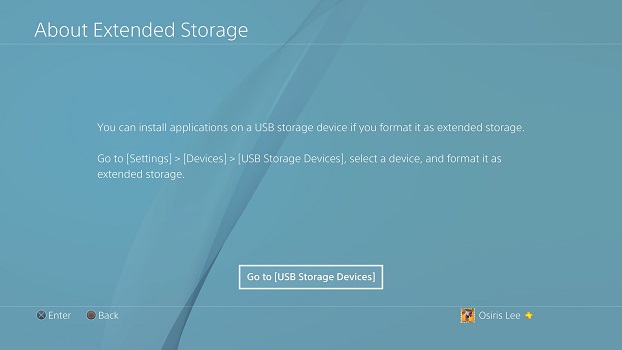
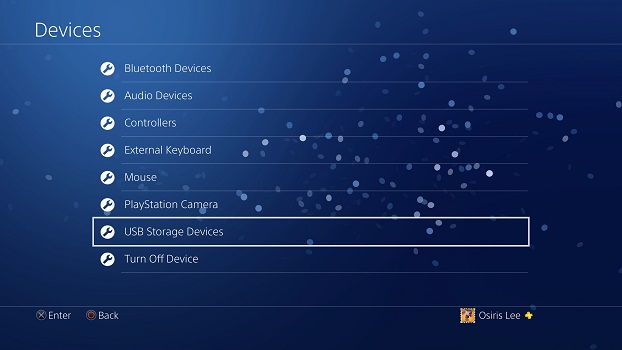
If you did not get the notification prompt, you can head to the same section by going into “Settings” from the main menu (you have to press up on the left analog stick of directional pad and then head right to the second to last option if you have a hard time finding it) and then “Devices” to find the “USB Storage Devices” menu.

The Western Digital My Passport Portable External Hard Drive should show up. If our case, we used the 4 TB version, which the PlayStation 4 displayed as the following:
- My Passport 25E2
- Western Digital
- 4.01 TB
After selecting it, you are then given the option to format it. By doing so, the system will give you several warnings before proceeding. The first warning is that saved data, screenshots and video clips can only be saved on the system storage (in other words, the internal PS4 hard drive). Thus, you won’t be able to transfer and/or install any of the aforementioned data types.
The other warning is that, by formatting the Western Digital My Passport Portable, you will lose all existing data on the external hard drive. So, if you have any precious data stored on the external HDD, then you should transfer it to another device before starting the formatting procedure.
Once you are comfortable, you can continue on with the formatting. After completion, you will see the amount of free space available for use with the new extended storage. In our case, our 4 TB drive can store up to 3.68 TB of data after being formatted for the PS4.
Changing the Install Location
After formatting, the system will also tell you how to change the install location as well as how to stop using the new external storage.
To change the install location of a game, head over to “Settings” and then “Storage.” From there, press the Options button of the DualShock 4 to bring up a sub-menu that will give you access to the Application Install Location. Selecting it will bring up two possible option System Storage (which is the internal hard disk drive) and Extended Storage (which is the Western Digital USB 3.0 My Passport Portable External Hard Drive in this case).
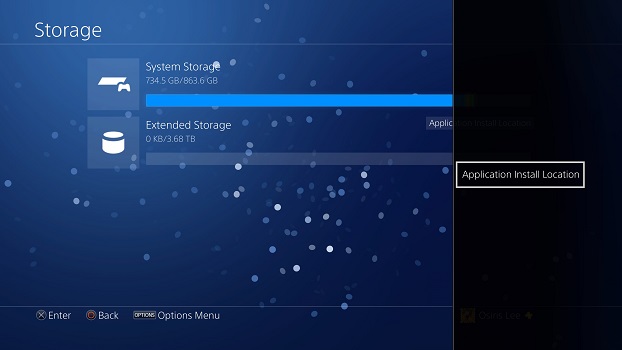
Now all your digital and physical games will be installed in your location of choice.
Stop Using the WD USB My Passport Portable External Hard Drive with the PS4
If you want to stop using your external hard drive with the PlayStation 4, the safest way to do so is by heading to “Settings” and then to “Devices.” From there, head to “USB Storage Devices,” select the external HDD and then pick the “Stop Using This External Storage Option” so that you can safely disconnect the My Passport Portable from the PS4.
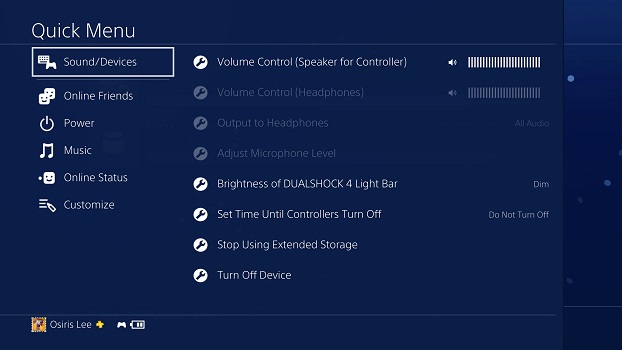
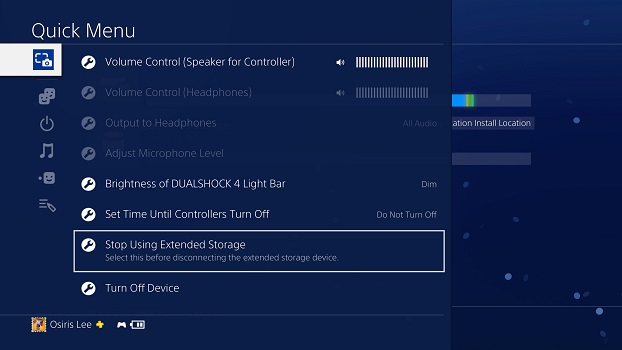
Alternatively, you can also hold the PS button of the DualShock 4 until you bring up the Quick Menu. Select “Sound/Devices” from there and then the “Stop using Extended Storage” option.
If you want to use your external USB hard drive again on the PS4, you simply have to re-plug the USB cable.
Transferring Application Data
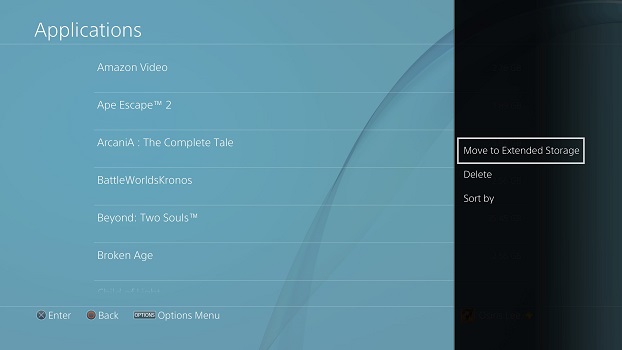
Another feature to check out is the ability to transfer Transferring Application Data between the internal hard drive and the My Passport Portable External Hard Drive. This will allow you to move games between the two.
To do so, head to “Settings” and then “Storage.” Select the hard drive in which you want to move the game data out of and then head to “Applications.” From there, press the Options button on the controller and then select “Move to System Storage” (if you are moving the data from the external drive to the internal one) or “Move to External Storage” (if you are moving the data from the internal drive to the external one).
Afterwards, you are given a list of games that you can select. Once you are done with your selection, press right on the d-pad or right analog stick and then choose the “Move” option to perform the transfer.
So, if you are planning to use the Western Digital USB 3.0 My Passport Portable External Hard Drive with the PlayStation 4 or PlayStation 4 Pro, make sure to follow our set up guide above.